Saturday, October 4, 2008

More unfinished business COMPLETED!!

ke
Here is something I made that I am so happy about...
A fleece top with pockets and trim from another fleece, then pants to match.

We just love Dora the explorer and she love loves these yoga pants and top. I have started to make some aqua colored pants for her and have some dora cotton fabric that I serged around dora and boots to make little "patches" for the pants and the matching top that will come ONLY when the pants are complete and the other unfinished items are CoMPLETED!

Saturday, September 27, 2008

Unfinished Business....


Wow...so I am finally working on my "unfinished business". I made a list of all the items that I have started and not finished...and it was LONG...


So, off I went today to

get some of the items off of my list.

So first on my pile and list was the BEAUTIFUL Mei Tai which is pictured above. I have had this MT partly started for OVER 1 year. Felt VERY good to finish this...so I am off to sell it. :) My kids are both too active to anymore to be in them....once my babe showed in the pictures could see, he wanted no part of being confined! Still doesn't want to as you can see from Mr Active!

The adorable cloth diaper he is wearing is a fitted I serged, and it is recycled from Daddy's old jean shorts that are too small. :) But I made 3 diapers from the jeans shorts but had to "stretch" the fabric and decided to use some fleece leftovers to make a cute diaper that daddy would love to see when the Colts are playing. I love the way it come out...but really, I didn't make it today, but in the last week. It is made from my own personal pattern.

The Wool longies are recycled from a sweater I found at the Salvation Army for 2-3$. I actually used a yoga pants pattern developed for my own kids based on a pattern tutorial developed by another mama. I have a post on here that has the directions on how to make your own pattern for yoga pants based on YOUR child's measurements too. LOVE how they look.

I did actually use up some old Joanne's microfleece that I have had lying around 4EVER! I made 2 pair of the yoga pants for my 2 kids out of it. BUT, we had an explosion of poo in one pair and then the other child walked through it and got some on the bottom hem of hers...so they HAD to go! :) I will wash those up tomorrow and then get them in them and take pictures of those to post. I am very happy with the results.

SO...as far as unfinished business goes...

2 microfleece yoga pants

1 MT

1 wool longie yoga pants

Pretty good start if I do say so myself.... :) Now to decide on what to work on next.

I do actually have a "business" to do list too...pictures, tutorials, sewing directions, diapers to sew for testing, web design and SO many other things...

But I have decided to work with my personal pile first, then finish my business sewing pile, THEN I will actually turn in the sewing machines to be serviced and I will then HAVE to actually work on my scrapbooking that is so far behind...another HUGE started and unfinished project. OH....I wish that I could just do one thing at a time. All that unfinished business. Maybe we will win powerball lottery tonight and have 101 million and not have to worry about having the time to do all the things I want to! (don't worry, we are not big players, we only use change and only buy one ticket when it is a HUGE payout.... :)

Sunday, August 31, 2008

Free Cloth Diaper Patterns, Purchased Cloth Diaper Patterns

Patterns for Sale:

Very Baby--Print AIO, Fitted, 2 cover styles --11$

Darling Diaper--PDF Unlimited pattern (fitted, AIO, Covers, pockets), Training pants 12.50$

Chloe Toes--Print AIO/fitted/pocket 17$

New Conceptions--Print Poo Pockets, Diaper Covers Deluxe 13$

Little Comets Tails--Print Little Starter Cover/fitted/AIO, Little One Size cover/fitted/AIO, Crescent Moon yoga (diaper cover) pants, soaker/trainer $10 ea

Kayla's Cloth Kits--Print and PDF One Size, multi-size Fitted/AIO/Pocket 7.50$

FattyCakes--PDF fitted/AIO/Pocket 6$

Hippy Hippy Snap--PDF fitted/pocket 5$

Mile High Monkeys--Print Soaker/skirty, Soaker Pants 15$

Wired up Designs--Print Sweet Baby Soaker/skirty $12

Artistry Baby--PDF Diaper Cover and One Size Mini Diaper $6

CyndieGran's Patterns--Print fitteds and wool 8$

Mosaic Moon--Print one-size diaper 20$

La Dee Da--pdf pocket $8.50

Trimies--pocket PDF $8


FREE:
Fitteds

Covers
Pockets


AIO/2

Wool/Fleece
Prefolds, Contours, & Flats

Trainers (though there is also a more detailed thread HERE.)


Tutorial sites (lots of styles in one site):
http://www.diapersewing.com/ -- side snap, tabbed, AIO, quick dry AIO, prefold, prefitted, plus diaper covers in fleece and PUL

http://www.geocities.com/mytafadhali/DiaperSewingTutorials.htm -- fitted, contour diaper with elastic, doublers, fleece AIO, fleece side snap cover...

Cyndiegran: http://webpages.charter.net/rhamley/diapers/diapertext1.htm -- mostly a tutorial on creating your own pattern and then sewing it, with a gallery of her pics.

VeryBaby Tutes (links in sidebar on the left)

http://diapersewing.wordpress.com -- free tutes and patterns


Sunday, August 24, 2008

Self Made Longie Pattern


Here is my little show off in her newest first try longies made from a pattern to fit her measurements. I went a little to short on the rise and since she isn't in diapers, I used measurements with panties... I love these. SUPER easy to make your own pattern. Super easy to make these longies. SO glad Stephanie on www.diaperswappers.com shared this with us and gave me permission to post the how to tutorial to make your pattern for perfect longies!

Make your Own Longies for Fleece/wool pattern!

The Below tutorial is from Stephanie from Diaperswappers.com, but I know there are a ton of people out there would love love this and are not part of the DS family. I suggest that everyone who uses or sews cloth diapers to join DS, but if not, here is a great way to draft your own pattern for longies for your perfect fit on YOUR child. I will be trying this today! :) As soon as the DS and DD wake from their naps....and yes, I will be trying this pattern on some cheap fleece first! :)


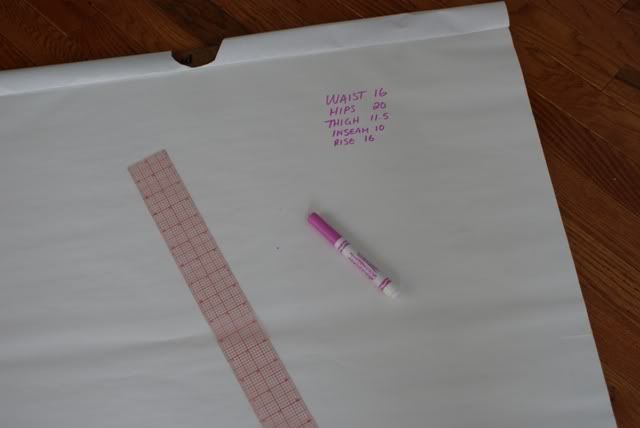
I just made my own pair for dd by drafting my own pattern using her measurements I measured her waist, hips, rise, thigh and inseam and this is what I did:

Supplies: A very large pad/sheet of paper (or a cut open paper grocery bag, or a few sheets of paper taped together) a marker/pen or pencil, a long ruler)
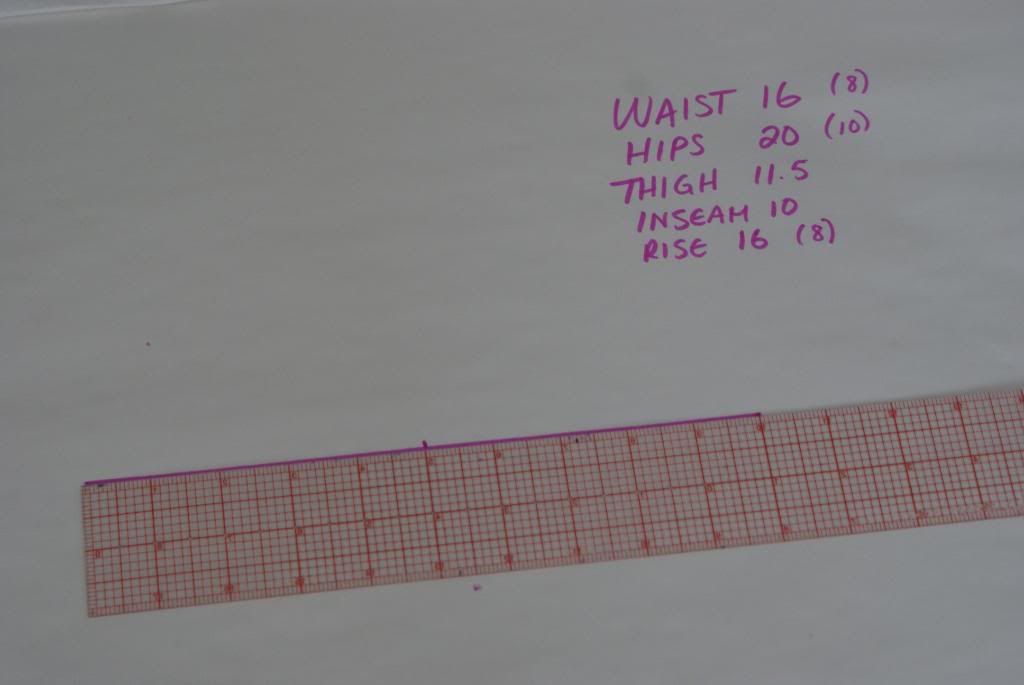
and your child's measurements


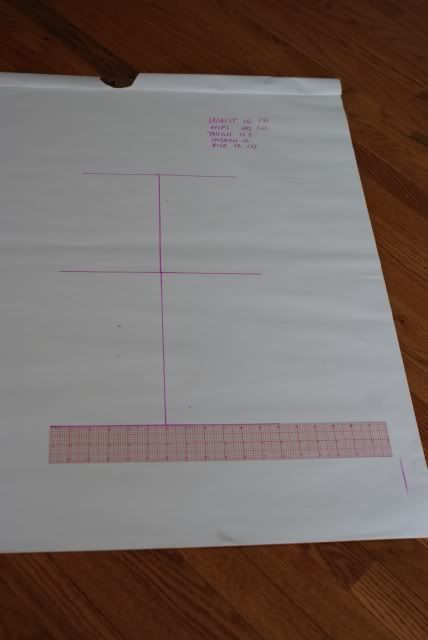
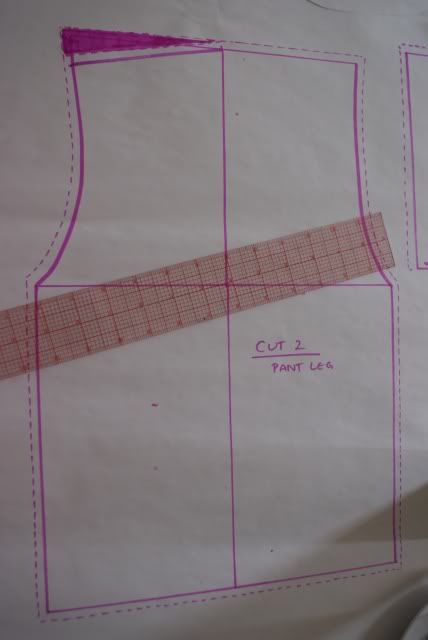
1) draw a horizontal line that is half the length of the child's hip meaurement, mark the exact centre of the line with a dot


2) draw a vertical line from that dot down, this line needs to be half the length of the rise -2"


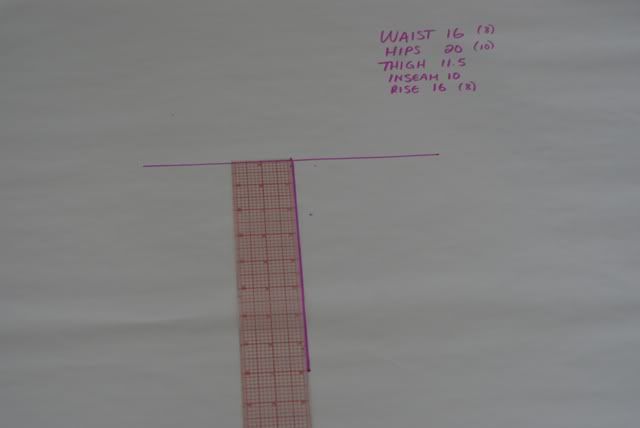
3) draw another horizontal line that measures the entire size of the child's thigh measurements + 1 1/2-2" (so the pants will fall nicely on the leg)


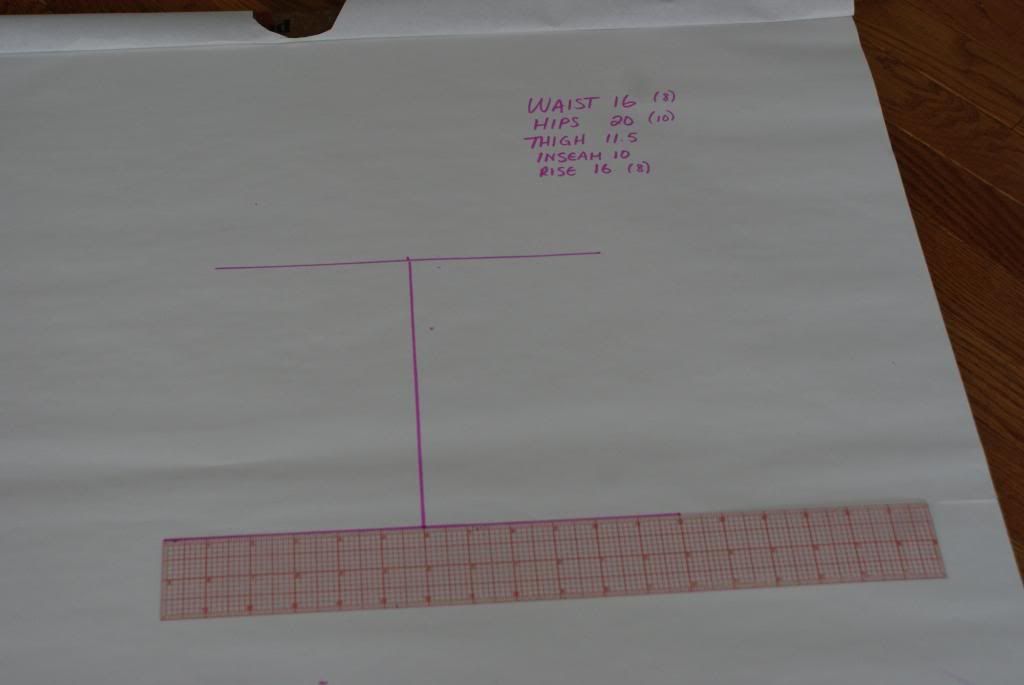
4)continue the vertical line down the length of the child's inseam + 1" if you want to turn the edge, if you're just going to have a raw edge (perfectly fine for fleece, or a lettuce/serged edge) you don't need to add the extra inch


5)now draw another horizontal line that is equal to the horizontal line in step 3


6)draw two more vertical lines on each end of the lines in step 3 and 5, that connect the horizonal lines


7)now, draw a slight concave curve (curve line inward) connecting horizonal line in step one to the horizonal line in step 3, do this on both ends


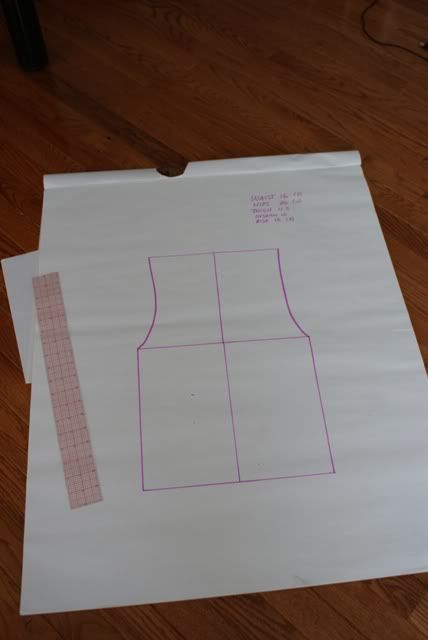
8) Add a quarter inch seam allowance using a dotted line all the way around the edge of the drawing


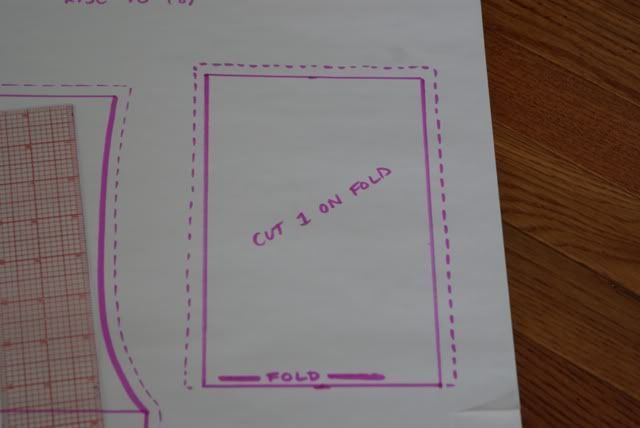
Now...you take half of the waist measurement and draw a line, then draw 2 perpendicular lines to that measuring 2.5 inches, and then another line parallel to the first (this will make the "yoga" pant waist)


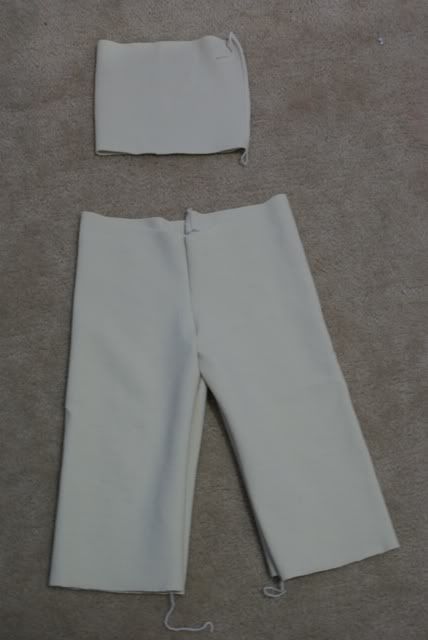
Cutting the pattern out of the fabric

-pin the pattern you have just drafted to your fabric, cut 2 out of the leg pattern and 1 out of the waist pattern piece (the waist pattern piece must be cut on the fold, making sure the direction of the stretch of the fabric is correct (must be stretchiest in the direction of the length of the waist not the width (along the longest part, not the 5 inch part)

Sewing:

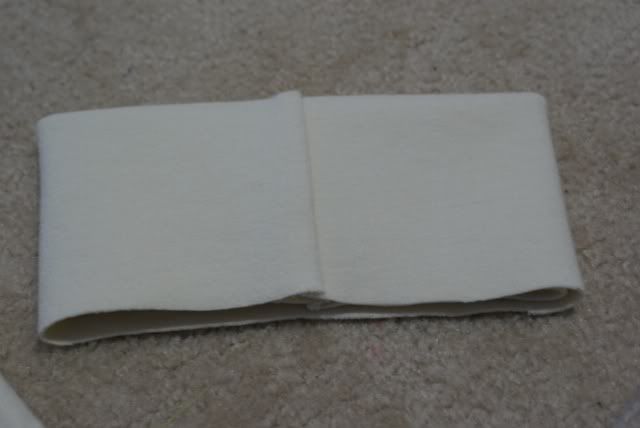
-fold each individual leg in half, right sides together, pin and stitch up the side using just a regular stich or a serger (stitch from the thigh to the cuff of each leg) Fold the waist band in half, right sides together so that the short ends are touching, pin and sew/serge


-turn the pant legs right side out and pin the legs together at the rise, stitch them together


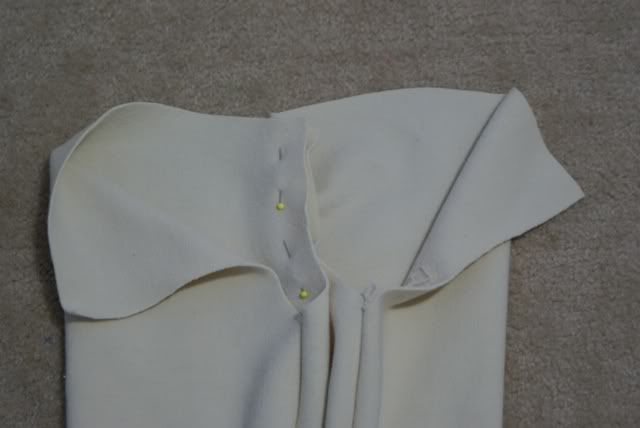
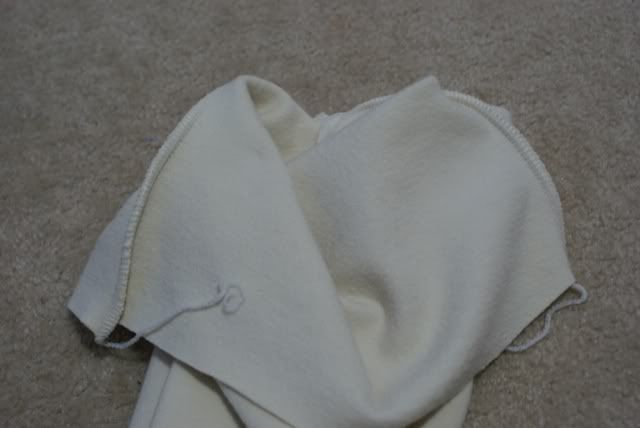
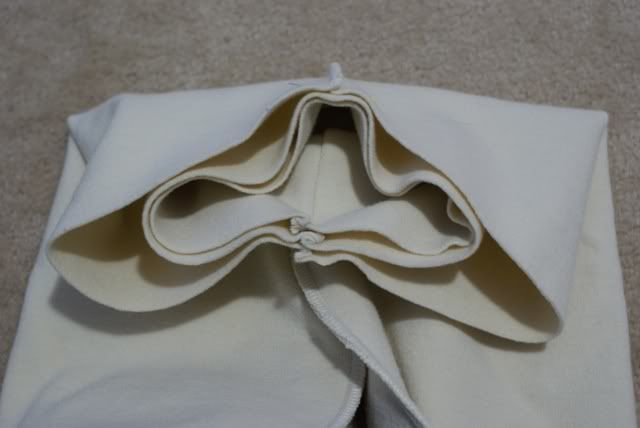
-turn the pants back inside out, turn the waist band in on itself (like you would a sling) pin the waistband to the inside of the pants at the raw edges, stitch making sure that you are stretching the waist band as you got to match the edge of the waist of the pants


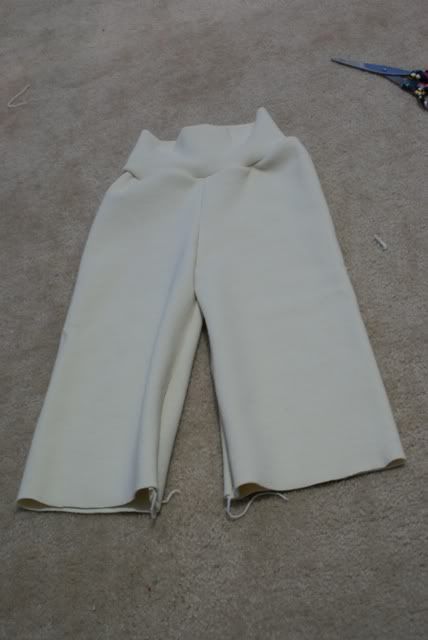
For fun I added a lettuce edge (to make them girlier for dd


Turn the pants right side out and try on your little one, sorry we don't have any action shots yet, dd is still napping (I put her down and then did this tutorial!)

Good Luck!

Some tips:

If you would like the front to have a lower rise than the back of the pants, mark one edge of the rise curve approx 1 inch down with a dot, then draw a line to connect that point with the top of the "rise" line (I'll try to update with a pic asap) (basically it will look like a little angle on one side, either left of right, not both, and it doesn't matter which side you choose as long as it's just one

EDT: Pic of the lower rise in front method


Practice makes perfect! Practice on some cheap fleece a couple times to perfect the fit before cutting in to that expensive interlock!

Friday, August 22, 2008

Look at all I got done tonight!!!! Projects finally finished!


What you are seeing is all detailed below, but they have been sitting for me waiting...waiting....waiting for me to finally finish them!!

Fitteds of my own, HHS, frankendipe pockets and then on the bottom are my LCT sprightly soaker out of recycled wool and the pull up trainer from LCT stellar transitions.

My Frankendiapers--pul pieced and cloth tabs


These are my own personal pattern that I used to make these cute diapers. I used my pul that was too narrow to make a full diaper, but then used scraps of DIY

pul for the tabs or for the backs/tabs...work great and are adorable...but I do only have a boy in diapers right now...hopefully I will have a girl the next time! :) or to be sold they will go!

Small and Newborn HHS diapers I made

Here are a few small and n/b hhs pocket diapers and AI2 diapers that I would have otherwise had to use the PUL for small wetbags, so the HHS is a great alternative!

My own pattern: Ladybug & Littleman in size Med

Here are two medium fitted diapers that I made from my own pattern which I call ladybug and little man--which is what I call my little models! :) Both of these are made out of recycled Tee shirts that I found were not being used by my husband or myself, or were grown out of.

Still haven't put on the snaps to finish it, but it is almost midnight and I figure that I have really gotten a great amount of "unfinished" projects completed! :)


LTC Sprightly Soaker out of Wool--diaper cover


It was easy, I loved making it and it looks great...made a large for a 22-30lb, so we will have to see when the babe wakes if it will work or not, as he is on the lowest end!

Made from 2 different sweaters from salvation army--made wool longies out of the striped arms and sold it for over 14, (sweater cost under 3$) so this is truly a free cover! :)

Will post pictures on the babe to see how the fit works! I did not use the high cut adaptation of the pattern.

LTC stellar transitions trainer diaper

This is a training diaper I made from the LCT pattern and it is okay to make. the white on the sides is one layer poly knit, the middle is purple pul with an absorbent core of 8 layers flannel. all bound with white foe. I like it and can't wait to try it on the little one!...er...the 3yr old!
Posted by Picasa

Monday, June 9, 2008

Sham Pocket Diaper


For right now, I am just putting up this jpeg for others to see...this is not my creation, but one from the Sewyourowndiapers group on Yahoo Groups. I am unsure who made the jpeg, but if you let me know, I will give her the credit due!

When I make it, I have a smaller front flap (in gray) and longer back (in pink) making the opening closer to the front.

I overlap the two fabric almost an inch, but when I use suedecloth, I add extra width to both parts of the inner fabric so there is more room to open and stuff. I don't actually do the curved edges for the overlap.

I love doing sham with the HHS as I can make the snaps hidden even when sewing the diaper and only putting snaps on at the end by doing the sham VERY far to the front. I have only done this with stretchy materials so far (microfleece/poly velour) but have a diaper waiting to be finished that will be with suedecloth, I hope it won't be too hard to stuff! :) Wait and see and I will post results!