Monday, March 22, 2010

New Sewing Accomplishment: Making my own Bias Tape

So...I am currently on the kick of trying something new every week to keep me motivated and doing lots of sewing.


I made a muslim of this dress from the Ottobre sized up for Alex--made from Anglina ballerina fabric that I dislike. I plan on making th real thing for Lilly in the right size in some super cute fabrics that coordinate and do self made bias tape out of a stripes and the body of the dress out of a dots fabric and make an applique of a butterfly on butterfly corrdinating print fabric that matches the other.


Here is the dress I made for alex...she does love it....it is the fabric....for her, she loves it if it twirls, has a beloved character or is pink and princess or butterflies or the such.


This weeks new item: appliques....a batman applique on an ottobre raglan top for Isaac's birthday. Almost done....good thing, because we celebrate tomorrow for his party! The next project will be this same top for Lilly but with an applique and designer fabric!

Beyond that---I am doing Easter dresses and even making a cute outfit for a little boy too!

Wednesday, March 17, 2010

Car Seat Recovering--UFO is done Yea, UFO is done YEA!

Okay, so I have a baby ready to bust out of her infant seat and wanted to recover her brother's black/grey one before *trying* (with fingers crossed) to fit it with the other 2 car seats in the back of the Corolla....Tomorrow is a nice day, so I guess I will have to try....Since I finally got it recovered!


I know I know...not supposed to recover. BUT...I didn't just cover it, I took the old one apart--big seam ripper day---and then covered each piece, sewed it back together (with the old one underneath) and then used my own FOE (lt pink)to bind it instead of thick ucky black stuff that is now in a landfill. Of course, it is better a little black binding in a landfill then a whole seat b/c I went to buy a girly one since there are no replacements available from the manufactuer.


I am happy. Hope it fitsin the car!!!.


OH...and it is a UFO--UnFinished Object.

I planned on not starting new projects till all my ufos are done...but last night I fell off the wagon (that wagon that I promised on MONDAY I would stay on... :)


I did those 2 body suits last night--but did them start to finish which is a BIG accomplishment for me! Oh...and the yellow velour one did NOT fit over her head...so now it IS a UFO and needs modification to fit...thinking split the back neck, add a tab with a snap ...might work...hope so cause it looks pretty decent! The turquoise one is on her now and MATCHES some CUTE CUTE fabric I have been wanting to use for a long time...now I know my next project....since I did get a ufo done--


maybe I should do one more UFO first....the Olivia from Farbenmix that is cut and waiting...out of hello kitty knit for my dd#1. Made one for her friends birthday and never finished hers! :)


But, on to bed as it is now the next day....happy thursday!


Here is the new car seat

Tuesday, March 16, 2010

2 Ottobre 06/09 puolukka velour bodysuits for Lilly

Here is the stash of fabric I got from FashionFabricsClub.com

All were under 3.00 and even with some white interock being over the 3.00 mark and shipping, they evened out at under 3.50/yd...pretty good!

Here is the 2 body suits that need snaps yet... the "Puolukka" bodysuits from Ottobre 06/09 and I hope they fit over lilly's head...neck seems small..but I followed the pattern!

A few lessons learned about the coverstitch binder I used as seen below!

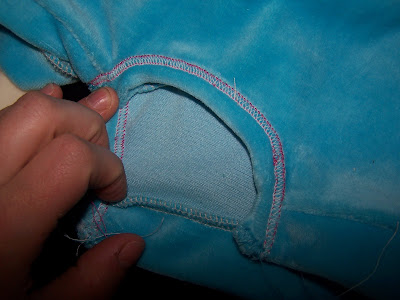
Here is the Velour bound binding that looks fine, but I placed the binder to far to the right and it didn't catch the raw edge with the needle on the right side of the fabric...oops, at least it isn't a woven and will ravel, and, well it will be right between her legs, not showing!


One side done right! Yea for me!

OOPS, on this one I accidently put the binding on upside down or on the wrong side...again, at least it isn't visible when wearing! :)


Few lessons learned...next time>I WILL have perfect binding!!!
Hope they fit, but it is too late to wake her up and try it on her tonight....and it doesn't match the green outfit I have slated for her to wear to morrow--but I might have to try it on her anyways! Pictures to follow! :)


Tuesday, March 9, 2010

Doing Soak Off Gel Nail Polish at home....my first time

Okay, so I did it. I got my nails done for free at by my hair gal with OPI gel nails that are soak off polish, not length, just for polish and loved it. After 2 weeks I went back and got it done and paid for it and love them...but just can't afford to keep paying that...

so...I went online and did some research and found places to buy opi gel polish kits (ebay and amazon), but it was expensive-- ($100 and you still need a uv light), and I wasn't thrilled with color choices at the salon (which are the same as found in the kit). So I started looking at all the other companies and found on ebay and sally beauty supply stores the IBD gel nail polish system.

FYI: I got my uv light and all ibd products on ebay--I got a bonder, clear gel, color gel, top coat

The pictures below and the lessons learned by my husband and myself... (yup, he helped me--he used to be an artist and doesn't mind doing nails--does Alexandra's (4.5yr old) all the time)

1st lesson--NEED LOTS OF LIGHT--there is a reason that salons are bright and they have the spotlight at the manicure table! If you can't see well, you paint against your cuticle and edgewall--which we/I did alot. As seen in the picures.

The chips in the pictures and at the cuticles are from me trying to remove the extra gel stuff over my cuticles and the sidewalls.

Secondly--I put on WAY WAY too much bonder. It is really runny and it will roll down to the sides of your nail as it cures and turn out too thick on the sides and attach to the skin and lift lift lift . I found this website info helpful about bonder and how to apply AND a removal system that isn't the normal "soaking" but wrapping in soaked cotton and foil. I will be trying this as a mom with hands is better then one with her hands stuck in a bowl of acetone!

Next, I finally went looking for any more "at home" tips and had forgotten about Utube! Duh. I found a bunch of videos on applying gel polish. Worth looking there.


Tonight--trying out the wrapping nail off system to take off the messed up polish and try anew on Thursday or Friday!